| This article is a stub. You can help ATLAS Wiki by expanding it. |
Please follow the steps below to create your own ATLAS Dedicated Server!
We're still working on getting this fully set up, but for those of you who would like to host your own Unofficial Server, you can do so now. We've got some more information that we'd like to include with this, as well as some more setup but it'll come in time as right now our preparations are focused on the base game. Though we know a lot of you are quite savvy and comfortable diving into this yourselves, so we wanted to make the basics available 🙂.
Here is a link to the ServerGridEditor src, as well as our wiki which covers some technical info on how to get started:
https://github.com/GrapeshotGames/ServerGridEditor/wiki
https://steamcommunity.com/games/834910/announcements/detail/1701696770555409959
Over time we'll be editing the wiki to include more information, as well as cover as many of your questions as possible. The LINUX server files are not yet online as we're working on resolving some technical issues, we hope to make the server files available as soon as possible
Community provided server setup Guides
Setting up a 1x1 Server
Server Requirements
Each Grid has its own Server, the requirements per Grid/Server are shown below:
| RAM | 4GB |
| CPU | 2 Cores |
| Storage | ±20GB |
Downloads
NOTE: Make sure you update ServerGridEditor when changes are made to the git! Or even better- setup GIT and have it pull updates for you!
Server Setup
- Create a directory where you will put the server files (Eg. X:\AtlasSrv)
- Open "AtlasSrv" and create "steamcmd" and "AtlasTools"
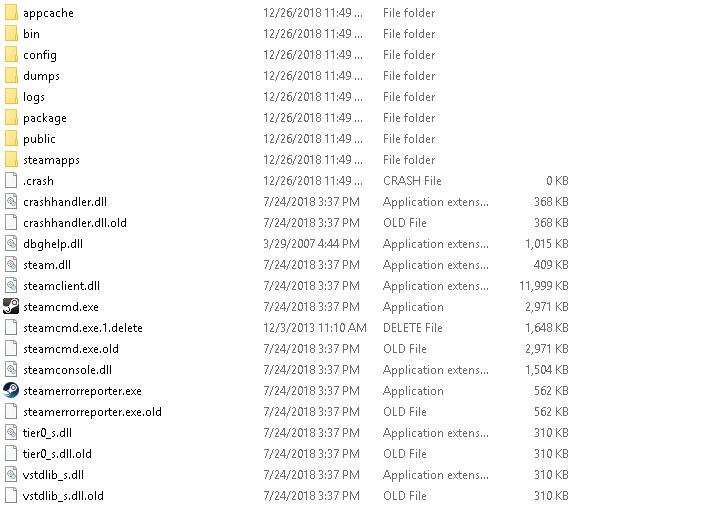
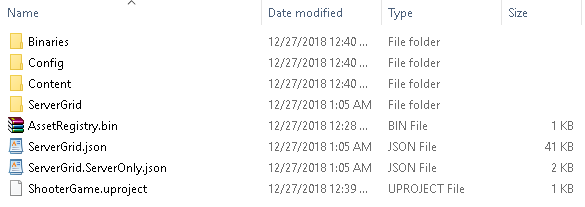
- Extract steamcmd.zip into "steamcmd" and run "steamcmd.exe" 1 time to set it up. When the prompt shows "Steam>" with an OK message above you can close this window. "steamcmd" folder should look like this now:
- Go back to "AtlasSrv". Open "AtlasSrvBats.zip". Extract the "LAUNCH_ATLAS_00.bat" and "ATLAS STEAMCMD.BAT" to this folder.
- Right-Click "ATLAS STEAMCMD.bat" and click Edit. Replace the contents of this file with (Change "X:\AtlasSrv" in both entries with the directory you are using):
start /wait /high X:\AtlasSrv\steamcmd\steamcmd.exe ^

+login anonymous ^

+force_install_dir X:\AtlasSrv\ ^

+app_update 1006030 validate ^

+quit
- Save & Close. Run "ATLAS STEAMCMD.bat. You may be prompted with firewall permissions, you must "Allow Access". (This process will take some time)
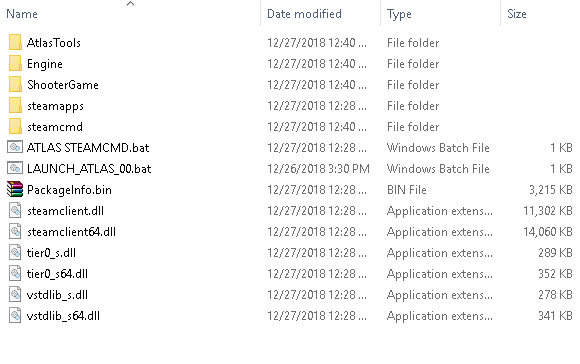
- Your Atlas server directory should look like this upon completion:
Map
- Congrats! Your server files are now downloaded and on the latest version. You can use ATLAS STEAMCMD.bat at any time to validate and upgrade the server. Now onto the map!
- Extract "ServerGrid1x1" folder from "AtlasSrvBats.zip" to the "AtlasTools" folder
- Extract the ServerGridEditor zip to the "AtlasTools" folder. Open "ServerGridEditor.exe" within the "SeverGridEditor-master" folder
- Open the "Island Editor" (ServerGridEditor.exe), "Open project" and navigate to the ServerGrid.json file we extracted into "AtlasTools"
- Click "Project > Create" in the top left. Copy the "Atlas ID" and CANCEL.
- Click "Project > Edit":
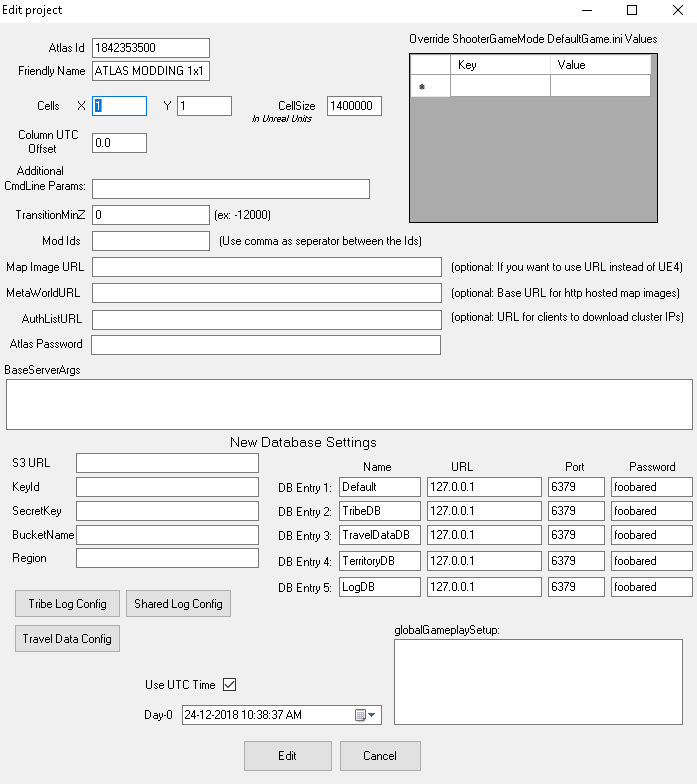

- Paste the "Atlas ID" you have on your clipboard into the "Atlas ID" of this window.
- Change "Friendly Name" to your Server Name. Change "Atlas Password" if you want a password on the server (This will be needed to keep people out for singleplayer!)
- Click "Edit" at the bottom.
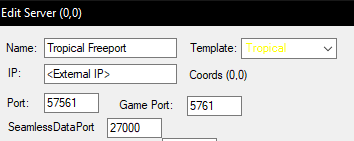
- Ctrl+Left Click on the map:
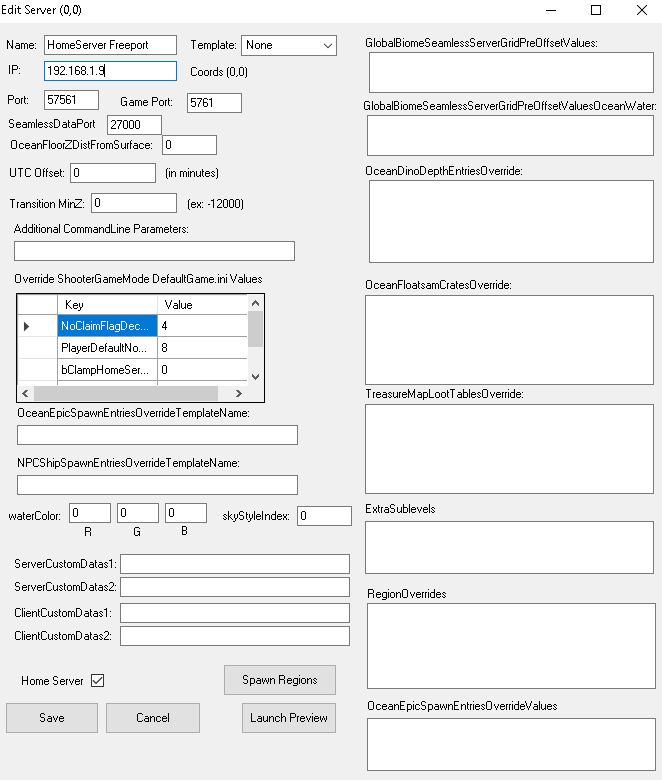

- Set "Name" to what you want for name of your Freeport (Grid)
- Set "IP" to your Server external IP (whatismyip.com). Server internal IP (192.168.x.x) can be used, but this will disable public access!
- Hit "Save" at the bottom (You can make more changes later but in first-time situation, it's nominally best to use default settings).
- Back in Island Editor (ServerGridEditor), Click Export > Local Export ALL. Click ok to the default location. Popup should say "Success".
- Back in Island Editor (ServerGridEditor), Click Export > Local Export ALL. Click ok to the default location. Popup should say "Success".
- Close Island Editor. Open "AtlasTools/ServerGridEditor-master/Export/" folder. Cut/Copy the "ServerGrid" folder and 2 JSON files
- Navigate to "AtlasSrv/ShooterGame" and paste
- Your ShooterGame folder should look like this:
- So close! Navigate back to "AtlasSrv" and Right-Click "LAUNCH_ATLAS_00.bat" and Edit. Replace the contents with (Replacing "X:\AtlasSrv" with your directory, and "SeamlessIP" with External IP)
start /high X:\AtlasSrv\ShooterGame\Binaries\Win64\ShooterGameServer.exe Ocean?ServerX=0?ServerY=0?AltSaveDirectoryName=00?ServerAdminPassword=123?MaxPlayers=30?ReservedPlayerSlots=25?QueryPort=57561?Port=5761?SeamlessIP=1.2.3.4 -log -server -NoBattlEye

exit
- Save & Close. Navigate to "AtlasTools/redis-server". Run "redis-server_start.bat". Wait for the command line to say ready to accept connections.
- Configure port forwarding with these ports on your router. Change the IP to match the one you put on the Map file:
| Name | Port Range | IP | UDP/TCP |
|---|---|---|---|
| SeamlessPort | 27000:27008 | 192.168.1.10 | BOTH |
| QueryPort | 57561:57594 | 192.168.1.10 | BOTH |
| GamePort | 5761:5794 | 192.168.1.10 | BOTH |
| RconPort | 28000:28008 | 192.168.1.10 | BOTH |
- The moment you've been waiting for; Navigate back to "AtlasSrv" and Run "LAUNCH_ATLAS_00.bat". When the command prompt displays how many cores it is running on, your server is up!
Setting up a 2x2 Cluster
A 2x2 Grid Server Cluster requires a bit more knowledge of networking, but nothing too fancy. For this tutorial we are gonna use the standard 2x2 Grid that comes with the Server Grid Editor.
Server Requirements
| RAM | CPU | Storage |
|---|---|---|
| 16GB+ | 8 Cores/Threads | 40GB+ |
Server Setup
- Open the Atlas Grid Editor
- Click Load a Project
- Open the ServerGrid2x2.json
- Hold ctrl and click the top left map
- An Edit Server window should pop up. Enter the following information:
- You will need to fill in the following information in every Map:
Ports Server instance 1
| Name | Ports |
|---|---|
| QueryPort | 57561 |
| GamePort | 5761 |
| SeamlessPort | 27000 |
| RconPort | 28000 |
Ports Server instance 2
| Name | Ports |
|---|---|
| QueryPort | 57565 |
| GamePort | 5765 |
| SeamlessPort | 27004 |
| RconPort | 28004 |
Ports Server instance 3
| Name | Ports |
|---|---|
| QueryPort | 57569 |
| GamePort | 5769 |
| SeamlessPort | 27008 |
| RconPort | 28008 |
Ports Server instance 4
| Name | Ports |
|---|---|
| QueryPort | 57573 |
| GamePort | 5773 |
| SeamlessPort | 27012 |
| RconPort | 28012 |
NOTE: Forward all these ports on your router to be able to connect!
- After prepping the Grid it's time to make the Start Commands, there will be a total of 4 commands, each of the commands start with the same base:
ShooterGame\Binaries\Win64\ShooterGameServer.exe Ocean?bIncreasePvPRespawnInterval=True?IncreasePvPRespawnIntervalBaseAmount=30?ServerX=0?ServerY=0?ServerAdminPassword=mypass?QueryPort=57561?Port=5761?RCONEnabled=true?RCONPort=28000?SeamlessIP=<ExternalIP> -log -server -NoBattlEye
Please Replace the following information:
- ServerX/ServerY: Change this variable to match the map coordinates (0.0 for top left, 1.0 for top right etc.)
- QueryPort: Change this to the port that matches the one you entered in the Grid Editor
- Port: Change this to the port that matches the one you entered in the Grid Editor
- RCONport: Change this to the port that matches the one you entered in the Grid Editor
- SeamlessIP: Change this to the external IP of your Machine. Such found on whatsmyip.org
Save the files as "Launch_Server_00.bat" OR "Launch_Server_10.bat" OR "Launch_Server_01.bat" OR "Launch_Server_11.bat" depending on the X/Y Coordinates used.
Launching the Cluster
- Start the Redis DB (Located in the AtlasTools Directory)
- Start the Home server "Launch_Server_00.bat"
- Wait until the Command Prompt Says: "Full Startup: XX Seconds"
- Start the Home server "Launch_Server_10.bat"
- Wait until the Command Prompt Says: "Full Startup: XX Seconds"
- Start the Home server "Launch_Server_01.bat"
- Wait until the Command Prompt Says: "Full Startup: XX Seconds"
- Start the Home server "Launch_Server_11.bat"
- Wait until the Command Prompt Says: "Full Startup: XX Seconds"
All done! you can now play the full 2x2 Grid ingame!
Creating a Map/Grid Using ServerGridEditor
The Atlas server grid editor is a project developed by Grapeshot Games which allows users to easily customize their server by generating custom JSON files.
This project will allow the user to define custom islands, design the in-game map, and generally customize their Atlas experience to the fullest extent, especially with clustered servers.
Starting Your Grid
- Open the Server Grid Editor
- Click Create Project
- Leave the Atlas the way it was but change the rest like this:
- Friendly Name (This is your server name)
- Designate Cell X and Y (This is your grid size)
- Designate your "CellSize" (Default Recommended: 1400000)
- Your Column UTC Offset (Default: 0.0)
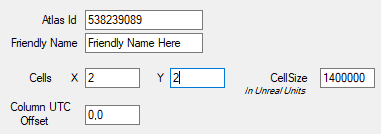
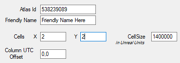
- Click Create
Making Your Home Server
- Hold CTRL and click on the grid you would like to be the "Home Server"
- Set the name of the server (Shows when traveling to the grid)
- Check the box for "Home Server"
- Save changes
- Add Starting Islands to the grid
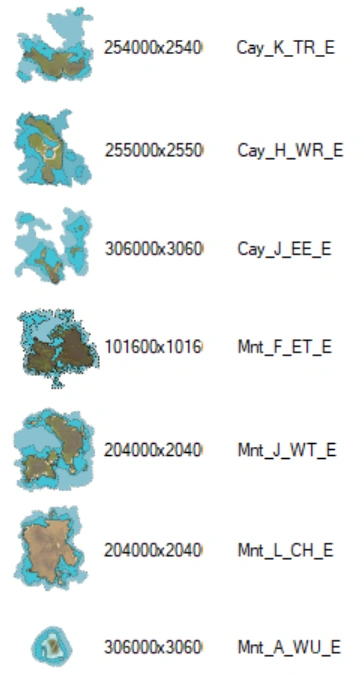
- You can have 4 different Freeport starter islands (North, South East, West).
- Confirmed Starting Islands with Freeports:
- CTRL+Left Click on your Island to edit the Island Instance
- Set your "spawnPointRegionOverride" starting with 0. (this turns spawning on for the island)
- The spawnPointRegionOverride will be +1 higher for each addition starter island (1 for north, 2 for east, ect.)
Setting Spawn Regions
- Hold CTRL and click on your "Home Server"
- Click "Spawn Regions"
- You will need a spawn region for each starting island
- Name your regions (These spawn names will show in-game)
NOTE: Parent Cell Will Populate Automatically
Adding More Islands
- Take note of the island size and biome when placing (Barren, Mountain, Tundra, Polar, ect.)
- Islands ending in _PVE will have caves and other difficulties to overcome
You can fill your cells with islands to your liking, keep in mind that every island has different resources and spawns. For a full list of Islands check here
Source
Unofficial, player run Atlas Server Help Discord: https://discord.gg/CSZavry